How to Remove the Middle Seat from Your SUV
DIY Captains Chairs – Remove Your Middle Seat: Making it Easier for Kids to Access the Third Row
Ever wish your SUV had captain’s chairs? Do your kids like sitting in the 3rd row and have to climb over everything? If you’re a parent with an SUV, chances are you’ve struggled with getting your kids into the third row. Climbing over seats and squeezing through tight spaces can be a challenge, especially when you have multiple children or multiple car seats. But, thanks to my sister-in-law who did this first (she’s a genius), removing your middle seat is quite easy. You remove 4 bolts and boom, done. Captain’s chairs. One key thing – you need a 40/20/40 second row. The middle seat must fold down by itself. 60/40 seat folds will not work for this trick.

TB Quick Hits (Summary)
- Easy DIY hack to get captain’s chairs in your SUV
- Makes the third row more accessible
- Provides more room inside the SUV
- Requirement: the SUV needs to have an independent middle seat (40/20/40 fold style)
- You do lose a seat (obviously) and it takes 20-30 minutes to put back in so I would only do this if you plan to keep it out most of the time.
- Free and easy – remove 4 bolts
Why Remove the Middle Seat in Your SUV?
Removing the middle seat from your SUV not only adds a dash of swagger, but it’s also an ingenious hack that creates captain’s chairs—transforming your vehicle into a professional kid hauler. But the real beauty of this trick? It’s all about making the third row more accessible for your squad! No more acrobatic feats are required to reach that elusive third row. This setup lets your kids navigate the cabin with the grace of a gazelle rather than the awkwardness of a baby giraffe. Plus, with the middle seat gone, you’ll find there’s more room for backpacks, soccer balls, or even the family dog. Transform your SUV into a family-friendly cruiser that combines style, space, and most importantly, easy access to every seat!
Gathering the Right Tools for Your DIY SUV Seat Removal
Before you dive into this DIY project, you’re going to need the right tools. Well – one tool. A ratchet set. Most SUVs secure the middle seat with four bolts. So, grab your ratchet, and prepare to liberate your SUV from the confines of an unnecessary middle seat. Don’t worry, your vehicle won’t miss it.
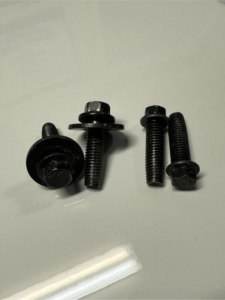
For our Volvo XC90 we had to remove 4 Hex Bolts:
2x in front of seat: 11mm
2x in back of seat: 13mm
Step-By-Step Guide: How to Remove the Middle Seat in Your SUV
- Begin by folding the middle seat down. This makes the seat less bulky and far easier to handle. Trust me, it’s hard to fold it once it is not secured to the vehicle. And it is easier on your back when you do remove the seat.
- Next, locate the bolts that secure the seat to the floor. Normally there will be four bolts in total – two at the front and two at the back. To access the rear bolts, it’s best to approach from the back of the vehicle.
- Now, it’s time to undo these bolts. Use your ratchet set to loosen and remove each bolt. Keep them safe – you never know when you might want to put your seat back in!
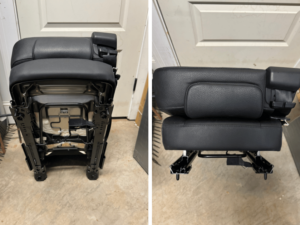
- PRO TIP: Open the tailgate for the ultimate exit strategy. Once all bolts are removed, the seat is free to move. The easiest way to get it out of the vehicle is through the back. Slide the seat out onto the tailgate, then safely to the ground. Boom – DONE! You’ve just removed the middle seat from your SUV. Enjoy the newfound freedom and accessibility your vehicle now offers. *Having a second set of hands certainly helps with removal.
Safety Measures to Consider When Removing Your SUV’s Seat
**Do seat removal hack at your own risk**
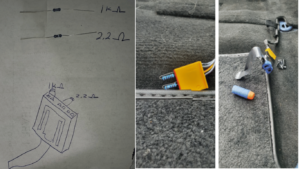
While removing the middle seat can be a sweet DIY project, it’s important to remember that you’re tinkering with your vehicle’s original design. I must admit, I haven’t crash-tested this setup, and bear in mind, that I can’t take responsibility for your decision to modify your SUV. It’s your rig, your rules. However, this modification doesn’t affect any other seats or safety features. For those of you with a Volvo, you might encounter a safety belt warning for the now-nonexistent middle seat – but don’t panic, a couple of resistors should do the trick see below for the solution. Just remember, safety first – always.
Making the Most of Your Newfound Space: Tips and Ideas – Add Carpet!
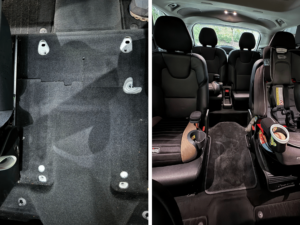
Now that you’ve successfully removed the middle seat from your SUV, let’s talk about customizing the available space. It’s important to note that I performed this modification on our 2016 Volvo XC90. The good news for Volvo XC90 owners is that Volvo sells an executive version of the XC90, which comes with a custom-cut carpet specifically designed for captain’s chairs. Once the seat is removed, you can easily install the custom-cut carpet, perfectly fitting the new space and securing it with the existing clips. This carpet not only enhances the look of your vehicle but covers the bolts as well.
Here is the Volvo Part Number (I scooped it on eBay for under $75): Textile Carpet Part: 32288264
If you are doing this on another car – search the forums or buy a piece of square automotive carpet. Makes the fit and finish look much better. Rubber is also a great option.
Dealing with the Seatbelt Warning on Your Volvo
If you are doing this to a Volvo and it starts displaying a seatbelt warning for the now-removed middle seat, don’t worry – I got you covered thanks to this SwedeSpeed Forum. This is a common issue that can be resolved with a simple little fix using a pair of resistors. You can find a comprehensive guide to this fix on the SwedeSpeed Forum. The forum provides step-by-step instructions on how to take care of this issue, making it a breeze for you to enjoy your DIY SUV modification without any annoying alerts. And remember, if you run into any issues or have questions along the way, feel free to reach out. I am happy to lend a helping hand and ensure your SUV transformation journey is as smooth as possible.
Pro Tip: DaveyP on the Sweede Speed Forum used a Nerf Bullet to cover the resistors, I did this as well. Works perfectly. Then just tuck it under the carpet.
Reinstalling the Seat: How and When?
Reinstalling the seat in your SUV is pretty straightforward – you’re just reversing the removal process. You’ll need to align it correctly onto its original position and secure it with the four bolts you initially removed. This task might take between 20-30 minutes, so make sure you’re not in a rush.
A word of caution though – only undertake this DIY project if you intend to leave the seat out most of the time. The process, while not rocket science, requires some effort and time. But hey, that’s the fun of these projects, right?
Removing Middle Seat – Is it Worth It?
Yes! For our family of 4, it is fantastic. Makes getting to the rear seat easier and when using the third row, it also adds tons of space to load the car up in between the seats. For a quick DIY hack, I would recommend this all day.


